Showing posts with label Brush. Show all posts

Friday, November 30, 2018

The care and feeding of brushes, and how to fix them when you don’t.


Using your brushes so that they last a lifetime.

  We all know that we need to care for our brushes, but after seeing some things recently, I have come to understand that there are a lot of people who don't know how to just that yet.  So here are my guidelines for how to care for your brushes, and what to do if you don't sometimes...
  These are guidelines, not rules to live by.  We all have habits, some bad and some good.  These are really just things to think about was you use your brushes.  I would, however, say things in the ‘never’ list you really should try to avoid doing.

       Always

o      Use a brush for one medium only.  Don’t use the same brushes for oil paints (or oil washes) and then acrylics.   The stuff used to clean oil brushes is pretty harsh (mineral spirits) and will really wear a brush out. 
o      Always wet a brush before you start painting.  Don't pick up paint with a dry brush.Unless you're dry-brushing, of course.
o      Once a brush is charged with paint, begin painting with it immediately.  This will pull the paint away from the ferrule.
o      Once you have rinsed a brush, shake out the excess water rather than rubbing or squeezing it out with a cloth or paper towel.  Never pinch and pull on the tuft with a towel, as this will break or pull out the hairs.
o      Wash and shape the brush hairs when you finish your work session, using lukewarm water and a commercial artists' brush cleaner (links below)
o      Treat synthetic brushes with the same care as natural hair brushes.  The rule to never rest a brush on its tip is even more important with synthetic brushes since they tend to retain any shape they get into.
o      Dip out and mix paints with an old brush or stick, never your best brushes.  If you’re mixing on a palette using your good brushes, just be sure not to get paint up in the ferrule.  

       Never

o      ‘Reshape’ a brush with scissors or X-Acto blade.  Trimming the ends of a natural hair brush leaves them in a 'broken' state and they will never get back to 'normal'.
o      Never hold a loaded brush with the tip pointing upwards.  The paint will ‘wick’ towards the ferrule and make it harder to clean.
o      Leave a brush sitting point down in water
o      Leave a brush wet with paint for extended periods
o      Let it dry out with paint on it especially in the tuft (or ferrule)
o      Clean or rinse a brush in hot water.  Hot water can affect the glue up in the ferrule and allow the hairs to pull out or get misshaped.
o      Avoid submerging the tuft in paint for long periods. This encourages the capillary action that causes paint to migrate up the hairs into the ferrule, where it is difficult to get out.
o      Do not submerge the brush in water beyond the top of the ferrule. Water will seep into the ferrule from either end.  This could cause the handle to swell, crack, and loosen in the ferrule.

Cleaning brushes correctly

  Cleaning is really straightforward, but if you’re not doing it right, you can really ruin brushes fast.  The cheaper the brushes, the more they get affected by bad practices.
       Never use hot water!  (see above)
       Use a purpose-made brush soap (Masters or Jentastic Goop), baby shampoo or something super gentle.  Never use hand soap or harsh cleansers.
o      Get the brush good and wet with water, swirl it in the soap until it lathers up a bit, then brush it in the palm of your hand to ‘scrub’ the bristles.  Never jab it or move it in a motion that would go against the ‘grain’ of the hairs.  Always be ‘pulling’ it toward the natural lay of the hairs. 
o      Rinse the soap out carefully in water, swirling it around for a while. 
o      Once cleaned, shake excess water from the brush.  Don’t dry a brush by wiping the tuft with a towel.  If necessary, shape the brush gently against the side of your finger so that it comes to a balanced point. Wash brushes need to be shaken out more assertively, as they hold more water.
o      If you’re crazy like me, now is the time to dip it into some hair conditioner (you’re wife’s bottle is probably in the shower, go grab a small squeeze of it in a small seal-able cup.  She won’t mind.)  Seriously, brushes are just animal hairs, and they dry out.  Conditioner helps them

Remedies - When you don't follow the 'guidelines'

  A good brush is always worth the investment. Not only is the finest quality, natural hair brush a joy to use, it can always be returned to its original state no matter how bad you treat it.  Cheap ‘box store’ brushes are not so forgiving.  Everyone I have met who swears by cheap brushes changes their tune when they start using quality brushes.
  That said, poor care and use of brushes can lead to them getting really hard to use.  Most often, the head of a brush will start to splay as pigment becomes trapped between the hairs in the ferrule.  This is what normally keeps them from holding a good point.  This will occur if paint is not thoroughly washed from the brush after every use, or the brush is used too aggressively to pick up or apply paint.  There are ways to fix this though!
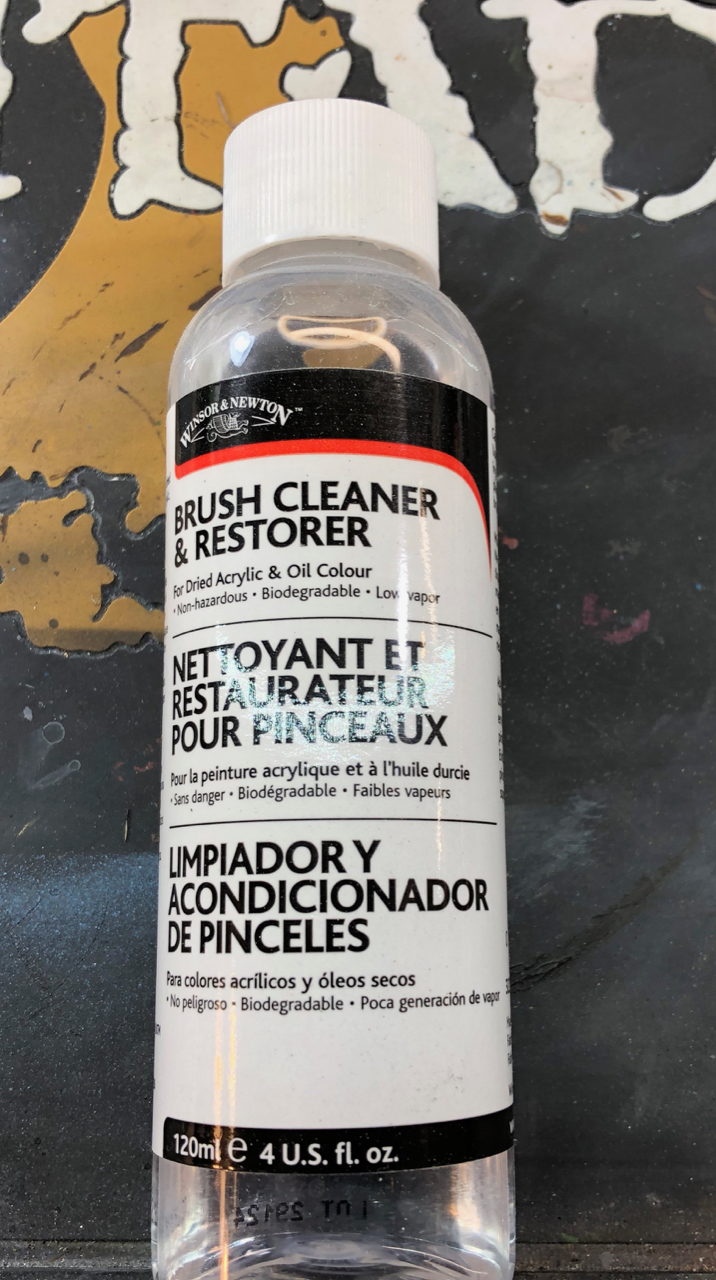
   Winsor & Newton sells a brush restorer chemical that is designed to ‘gently’ eat the paint that has dried in the ferrule.  I have used this stuff with great success on even some of the most abused brushes (Elric!).  All you need to do is put the brush into the bottle of cleaner (or a separate container, see the photo.) up to and a little past the ferrule.  This will let the cleaner fluid work the dried acrylic out of the brush.  They recommend soaking the brush for hours or even overnight if need be. 


  Once it has soaked for a decent period of time, run through the cleaning cycle.  Use clean water, brush soap and gentle scrubbing.

Hair conditioner

  As brushes are used and cleaned in normal painting, the natural oils in the hairs are worn or washed away. The usual symptoms are that the hairs will begin to look dried out or frizzled, the brush will not point as promptly when wet, and stray hairs begin to appear.   Some folks will use brush soap and actually leave it in the bristles without washing it out.  Let it dry them in an hour or so, rinse it thoroughly.  Most times that will work to recondition the brush.
  You can also wet and wash the brush in lukewarm water and then apply a small amount of hair conditioner to the wet clean hairs, work it in thoroughly with your fingertips, shape the brush to a point or flat edge, and let it sit for an hour or so. Thoroughly rinse out the conditioner and shape the brush to dry, and repeat if necessary.

Brush shaper or Gum arabic.

  After washing, if the hairs or bristles are still crazy splayed out, you can use gum arabic or brush shaper to shape the brush back to a point (most natural hair brushes come preshaped with gum Arabic on them and need to be cleaned before use).  Dip the brush in the brush shaper or gum arabic solution, shape with your fingers, and set it down where it can rest undisturbed to dry.   The longer it sits, the better the result will be.  Keep in mind though, if there is dried paint in the ferrule, it will not stay pointed for long after this treatment.  Go back to the remedy section.

Stray hairs.

  Almost always, just leave these alone, as long as the brush shapes to a good point and the strays do not interfere with your brushwork.  If you need to remove a nuisance hair, grip the hair carefully with thumb and finger, or a pair of tweezers near, the visible base (not the tip) of the hair shaft, pull it down and to the side against the edge of the ferrule, and snap it off at the edge, using the ferrule edge to cut it.  Try not to ‘pull it out’ from the ferrule, as it will leave a tiny bit of a hole in the glue and allow gunk to build up.  Don’t try to cut stray hairs with scissors or a blade, you won’t be able to trim it close to the ferrule without damaging the tuft.   
  Never attempt to "trim" stray hairs by holding the dry brush tuft near or against a flame. This will very likely burn off other hairs in the tuft and can invisibly blunt the tips of the hairs in the point as well.

Storage

o      Never store a wet brush upright, the liquid will just wick up into the ferrule and that’s never good.  Leave the brush horizontal or face down (not resting on the hairs) to dry, then store them upright.
o      Never store a damp brush in an airtight container. The dampness will cause mildew, and that will destroy the brush hairs.  Baaad!
o      Don't store brushes near heat (furnace vents, sunlit windows).  Heat is not a brush’s friend.

Traveling with brushes

o      To carry brushes on trips, use a brush roll holder or something expressly designed for that purpose.  Lots of companies sell roll up or zippered pocketed holders for brushes.  Tossing them into a box may not always be the best answer, they take a lot of abuse banging around like that.
o      Once home, brushes should be immediately unpacked from the holders, cleaned, shaped and dried in the usual way.  (Unless you already did it on your trip…)

  Always remember, once a brush is useless for one purpose, find something else for it to do.  Maybe it becomes the brush you use to pull paints out of a pot, or mix on your palette?  Maybe it becomes a new drybrush?  
  So there you have it, just an average painters ideas about taking care of your brushes.  Do you have to follow this like law?  Hell no, nobody would, but if I manage to change one bad habit, my work here will be done!

Thursday, November 15, 2018

Slowfuse gaming Bomb Wick brushes - a non-pro painter's review


  So, a few months back I ordered a set of these brushes from Slowfuse gaming.  I did it mostly because CK Studios recommends them for brush work.  After using them a while, I can see why.  They are really nice brushes, at a decent price and they have a lot of the things I like in a brush.

  Please, keep in mind, I am not a pro-painter, I'm just a tabletop ready kind of guy.  But I do like my tools to be good, and I do hope to improve my paint game as I go.  With the likes of Warhammer Community, Vince Venturella and others, I think my paint game is improving.  But you'll be the judge of that!  I say this so that you know not too place more stock in my review as opposed to a real pro painter.  But if Caleb recommends them, I'm certain I can't be too far off the mark.

The Shipping and Presentation

  The brushes shipped in a very nice, big tube, all had nice brush sleeves to protect the bristles.  No complaints on how they shipped.


  As you can see, I got 7 in total.  A #3, #2, #1, #0, #00, #000 and an x10.  I also picked up a tin of their brush soap.  Glad I did too, it's very good.  More on that later

  The brushes feel very solid, no loose crimps or manufacturing defects I could see.  They are light and have a good thickness to the handle that fits my hand well.

First clean

  Interestingly, there is a warning on the side of the tube that tells you to wash the brushes in a good brush soap before the first use.  This is because they ship them with a brush saver coating on them.  Brush saver is just a thick liquid that dries on the bristles and holds them in their pointed shape nicely and also helps keep the bristles free of moisture and contamination.  It's like putting conditioner in your hair.


  A lot of brushes ship this way, at least high end ones (Raphael, Winsor Newton etc.) but this is the first time I have seen the warning on the packaging.  Normally it's on a website or something.  Experienced painters know about this, but those new to the hobby might not, so I thought this was a very good touch.  Kudos to them for thinking of us 'little people'

Using the brushes


  As you can see in the picture, each of the brushes is long, and 'fat' and they come to a nice point.  The long and fat part means they can hold a fair amount of paint giving you more time 'on the mini' and less scooping up more paint.  The nice point means you can be accurate and, if you have a steady hand, get decent results with you brush strokes.

Snappiness

  One thing I look for in a brush is how 'snappy' it is.  I have no idea what the professionals call this, or if they even care about it.  To me, the snappiness is how the brush reacts as you finish your stroke and come off the mini.  Some brushes will snap really hard, sometimes even flinging paint at places you don't want.  Others will hang there limply in the same shape it was at the end of your stroke.  Then you find yourself having to 're-shape' the fine point before another stroke.   I'm not sure if that was a great description, but it makes sense to me.

  One of my issues with the GW brushes over time has been that they snap really hard when you end your stroke.  While this is ok sometimes, when I am blending or doing detail work, it's not great.  The Winsor-Newtons have a lot of snap also, less on the Raphael's. 

  These brushes seem to be a very nice middle ground between snapping back and retaining their shape.  The do return back to a nice straight shape quickly, but they also hold their point really well also.  It just seems to me to make them more enjoyable to use than other brushes in my stable.  Again, I'm not sure if this is really a thing, but with brushes, it's usually just a little thing that separates one brand from another.

  Using them also seems to be a very nice experience as well.  The paint flows well off of them (if it is thinned properly, of course).  The have a good feel in the hand and the hairs/bristles are fine enough that they do a great job without a lot of brush stroke marks (again, if you're properly thinned.)  I guess the best thing to say about them is that I keep going back to them to use rather than some of my others.

Brush Soap

  As you can see in the pictures, I also grabbed a tin of Jentastic's Drunken Brush Goop.  This is just a tin of brush soap, and if you know about caring for your brushes, you know brush soap is a must.  I have always used Masters Brush soap, it comes in a beige/brown plastic tub and is the almost universal go to for artists of all types.   Well, I tried the brush goop, and I have to say, it is different from masters (not just repackaged) and I kind of like it.


  It has a different look, and when you swirl a wet brush in it, it does not immediately lather up like the Master's does.  Instead it gets very soapy and slick.  Then when you whirl it around your palm, it lathers up nicely and seems to me, anyhow, to clean the paint out quicker.  Sometimes I have to soap, swirl, rinse and repeat with the Masters multiple times.  With the Jentastic goop, I was usually cleaned up in one pass.  It also 'seems' to me that the hairs are a little softer when they dry?  This is not a scientific comparison, it's all just observation and gut feeling, so you mileage may vary.  I would say if you don't already have Master's soap, then look into this.  If you have some already, you will never need more, so...

Reflections

  So, overall impressions.  I really like these brushes a lot.  They do everything you expect a brush to do.  They have great feel to them and they feel really good to use.  As a non Pro painter, I definitely give them a serious thumbs up.  And since Caleb Wisenback also does, and he is a pro, I can safely recommend them to anyone looking to step up their game.

  One thing I should add, I bought these and did not receive them to review.

Sunday, August 9, 2015

Citadel Brushes (cont) and Age of Sigmar WIP


  Well, it was a crazy weekend, but I did manage to get some work done on the AoS stuff.  While doing so, I got to check out the new Retributor Armour spray Paint from GW.


  Have to say, this is expensive, but it is VERY very gold colored.  With the exception of some non modeling paints, this is the best metallic spray paint I have seen.  In my time with the USAF, I have seen some very special purpose metallic sprays, but the cost of those was in the thousands of $$ per can.  Yes, this stuff is $28 bucks a can, but it is a HUGE time saver for the AoS Eternals and I like it.


  I also had the opportunity to play around more with the Citadel brushes and I am very displeased with the medium Layer brush in the range.  It could not keep a point and it splayed like nobody's business.  It was almost impossible to work with.  The other layer brushes were very good to use and held up rather well.  The glaze brush and wash brushes also did quite well.


  Anyhow, some quick WIP shots.  I'm kind of following the Duncan Rhodes method on these, but I am not taking a ton of time on them.  These are 'just for fun' models :)  I'm going with the gold armour look, but with green theme instead of the blue like the 'book' models.  The base coat will be Incubi darkness followed by some green layers.  We shall see...

Primed with Stynlyryzzzzz black and sprayed with GW Retributor Armour.  it is VERY gold in person and quite durable.  No flecking or peeling.

Terrible angle, but the troops with their wash on...

Retributors with some of the base coats and some washes on.

  Have to mention, I picked up my Apple watch on Saturday.  Very odd it is, I'm not sure if I love it, or if I just wasted a ton of $$??  time will tell...  HAH, get it?  time will tell???  Apple watch???  (I kill me...)

Friday, June 5, 2015

Citadel Brushes - Reviewed

  I have done it again, I have sacrificed my wallet to test out the new Citadel Brush range.  Well, most of it anyhow.  I had no interest in the scenery brushes or the re-branded green stuff spreader.

 These are a different take from usual brush ranges in the past, and on the whole, I kinda like them.  They have the following 'ranges'; Base, Layer, Dry, Glaze and shade.  There are technical and scenery ranges too, but not for this kid.

  The base range seems to be synthetic, and the dry range are something else... camel hair maybe?  The rest are other natural sables, but I do not think they are kolinsky sables, with the exception of the Artificer Layer, which is their finest detail brush.  They seem to me to be reasonably priced, again, except for the artificer layer brush which comes in at a whopping $20, most of the range is in the $5-$10 range.

  Overall, I think they are good for someone just getting into this and looking to get a decent set of brushes.  I do not think they will replace the Winsor-Newton series 7 or Raphael's for the golden demon types, but for us mere mortals, they do seem to do the jobs.  Let me break them down for you now...


Saturday, August 23, 2014

3d Printing a new Brush Holder

  Well, I have to say, I am pleased.  I have finally designed, printed and assembled my first 'thing' with my 3d Printer.  Oh, i have printed a lot of things that I downloaded, but this is the first object that I designed from the ground up.

  What is it?  Why it's a brush holder.  I had an older one I made from wood, but I always found it a bit... lacking.  Oh it worked just fine, but it only held a few brushes and it was kind of a kludge, all things being equal.

  So, off the Sketchup and Blender I went.  It took a while to knock the design up the way I wanted it, but in the end, it came out just the way I wanted it.

  What does it do?  It holds brushes when I am painting.  I have never been good at holding brushes in my hand for 2 and 3 brush blends, so this helps out there quite a bit.  It also holds the brushes horizontally while they dry.  While storing them in a cup is completely viable, I have heard from really good painters that storing them horizontally helps keep the water from building up in the ferule and causing premature rot and other bad things.

  I designed the ends with holes for nails or small screws, but I ended up gluing them to my base after all was said and done.  I also used offsets on each end so that you can 'stack' 2 or more of them to create even bigger holders.  I actually printed 4 of them so I could make a double stack.  I may make another for some other brushes I have around as well :)  Here is the whole thing in pictures;

 The finished, printed items.  Very nice even at normal resolution.  I didn't even think about fine resolution since printing 2 at a time was about an hour and forty five minutes.
   A side view, showing the way they interlock. 

Sunday, January 27, 2013

Review: Let's Paint Black Templars

  Call me crazy, if you like, but I like painting tutorial videos.  I seem to be able to pick up something from every one I watch, no matter how bad they might be.  This 2 DVD set from AGProductions is not bad, in fact it's the best I have seen to date, save for the GW "How to Paint..." DVD.

  The DVD I bought was, oddly enough, Let's Paint Black Templars.  I wondered when I clicked "buy it now" how the producer could possible spend 4 hours (2 DVDs) on BTs.  I mean, really, slap on the black, pick out some white and metallics and bammo, you're done.

  Not so fast.  Christopher Davidson starts off with the very basics, how to build the marine in a way that makes it crazy easier to paint.  I had always left the bolter off the fig, but Christopher has a way better take on how to do things, and the one Marine I have painted so far shows the effect of this improvement.  (No, I'm not going to divulge all his tips in the review, buy one of his videos for that :)

  Christopher then goes on to talk about all the normal stuff, but he uses an approach you don't normally see on youtube vids, and I think it works darn well.  Especially his take on edging, which I have never seen done anywhere before and is great for someone like me (old, with brush control issues :).

  Just for those alone, the $15 price tag is justified, but wait... there's more.  Seriously, at $15 these are some of the least expensive DVDs I have seen and you get 4-ish hours of instruction.  The production value of the DVDs is great.  The steps he uses are clear and in focus, most of the time.  Every now and then he may drift the area being painted out of the camera, but he corrects it right away.  You're not going to find yourself annoyed by this, but it happens once or twice.  He has a very moderated voice that does not grate on your nerves over the duration of the video.  His words are well thought out and it does not seem scripted at all.

  And best of all??  There is NO FREAKING BACKGROUND MUSIC.  DVD producers take note, background music SUX!  I don't care how much you really love that loop from your favorite (crappy) band, hearing it loop 500 times while you tell me how to paint is FREAKING LAME.  STOP IT.  For the love of god, at least turn it down.  Some videos I own (see this review, not mentioning names) have music so annoyingly loud that you cannot hear the speaker, and it's not like it's good music either.  It's crappy loops, you see them on YouTube all the time.  Why people?  WHY????

  If the DVD has any weak spots, it's the menu/navigation again.  I know what a pain it is to author DVDs with menus that work in every machine and computer, so I don't harp on this too much.  I have 6 computers here and 2 different DVD players that I use frequently, and as usual, the menus work great with the mouse and keyboards on the computers, but less so on the dedicated DVD players.

  All in all, this video gets an A grade, or 90 out of 100 on the DVD coolness scale.  It is not for general use painting, it is very Black Templar specific, but the techniques are usable anywhere.  Production and sound quality are GREAT.  Content is top-notch.  Alongside the Hot Lead DVD's and the GW How To Paint Citadel Miniatures, this video stands up very well.  Kudos to the author!!

Ciao for now...

Saturday, January 19, 2013

Review: Vallejo Surface Primer

Vallejo Surface Primers
  So, it's been pretty cold around here lately.  That means no priming, and that means no painting.  I'm not liking that!

  Surfing around the Vallejo website, I came across their Surface Primer line of paints.  I did some research and a lot of people really like these primers.  Well, off to the War Store to get my order filled and a week or so later, I'm in business again!  And what kind of business it this.  This stuff is GREAT!

  I have always been  user of GW's primer line (Chaos black and Skull white) and I have never really had reason to doubt them.  I have always liked the black better than the white though.  The white seems to go on powdery sometimes, and yes, I am not spraying too far away.  I have tried what some other folks had mentioned, Krylon and the Hobby Lobby brands, but I always found them lacking in some way or another.  Either they were not smooth or they were splotchy.  Suffice to say, I always ended up back with GW primer, paying the huge GW tax for the great name on the can.

  There really is not a whole lot you can say about primers.  They need to do some very simple things.  Bond well to the surface your priming (plastic, resin or pewter, in my case) is the most important thing.  They also need to be tough, resistant to damage from rough handling.  If the primer chips off, all your hard work painting goes with it.  Lastly, they need to be thin to not hide any surface detail and provide a smooth surface to paint on.  GW's black primer had always done all that for me, or so I thought.

  Enter the Vallejo Surface Primers. These come in plastic bottles (17ml, 60ml and 200ml).  Vallejo says they can be brushed or airbrushed on.  I tested both, Vallejo is right.  Brush painting the primer on is a breeze (with a decent quality brush... see this post).  It flows on nicely, dries very smoothly and is very thin.  As long as you don't glob it on, brushing this stuff on will yield results much akin to using a rattle can.

  Then came the airbrush.  To be honest, the wife was sleeping and I didn't want to fire up the compressor while she rested.  Once she was up, I was able to break out the older airbrush (an Iwata revolution CR).  I used the Iwata because it is a .3mm brush and the Renegade Krome is a .21mm.  I had heard that the primer sprays better at the .3mm size.  I did thin it about 1 part primer to 1/2 part mix of Tamiya Acrylic thinner (X20) and Golden Airbrush Medium.

  It sprayed on like a dream.  It covered really well and dried very quickly.  I did some drop tests from about 8 inches to my wooden tabletop after letting it dry for 12 hours and no chips.  Best of all, the surface is baby-skin smooth and accepts paint like... well... like a primer.  Best of all, I can paint prime my figs inside without all the hellish fumes!!!  And who cares how cold it is outside?  As a side note, the white is every bit as good as the black, and WAY better than the GW skull white!

  All in all, this is GREAT primer.  If you need it, run, don't walk to get this stuff!

Monday, October 22, 2012

Winsor-Newton Series 7 vs. Rafael 8404 Brushes - A non golden demon winner's Review

Winsor-Newton series 7 and Rafael 8404 series Brushes

Just like I started my airbrush review, let me tell you that I am not a great painter.  At best, I am an average to decent painter.  I can usually make my armies look decent, but they will not see the final table of any judging.  I think that is what is going to make my review of these brushes appealing.  I have no mad skillz.  I'm just an average painter.

A while back, I was painting my Necrons with the brushes I got from citadel in the various Paint sets and the 'eavy metal set I had.  I have to say, I thought I was doing ok, until I started listening to the podcasts.  All of them, Screaming Heretic, Independent Characters you name it, I listen.  Whenever they talked about painting, they all stressed getting good brushes and taking care of them.  Well, I thought I had good brushes but then I heard and read an article on the Winsor-Newton Series 7 (WNS7) brushes.  I went to Dick Blick's and ordered a set of 4.  I have to say, there was an immediate improvement in my painting.  I also learned from the podcasts and articles not to paint with the tips, but the sides of the brushes.  Nifty trick there.