I spent the day regretting the pictures I posted of the Imperial Knight. The blue background was a mistake, I should know better by now... So, just some new photos of the same guy. Without the colour sucking horrid blue background. Sorry about that...
A Wargaming, Warhammer AoS, WH40k, and other miniatures hobby blog. I like to review products, talk about things going on in the hobby world, and hopefully help people with modelling hints and tips.
Showing posts with label Finished. Show all posts
Tuesday, March 25, 2014
Imperial Knight Build - Day 7 - Done!
So, I was only able to a little work on Saturday, and a little Sunday. Finished the base today. I am really jazzed with how he came out. Especially the decals. I always worry with them, but I followed all the rules and they came out pretty good. The matte finishing was a real trial too. I started by spraying some Valejo matte finish through the airbrush, but it frosted really badly on some pieces, on other is was fine? How odd! I was able to take it outside on Sunday and shoot a coat of GW's Purity Seal on it, and it toned down the frosting a lot.
For the decals, I finally did it the right way from start to finish. I put gloss varnish on the pieces first and let it dry. I used Micro-Set to ready the area and then cut and dipped the decal. Nudged them into position with the brush and then blotted up the excess. For the curved areas, I followed that up with a coating of Micro-Sol to get them to soften up and hug the contours of the model.
So, all in all, this is a great model. It was fun to build, a blast to paint and the options are fantastic. The pose options are great, and the instructions are very clear on how to put all the fiddly-bits together. I hope you all like it. Bring on the D!!!
On with the in-process pictures;
Some shots of the Decal work in progress. Very happy with how they turned out.
Did some work on the end of the Melta gun to make it look better than just a black barrel. Got pretty brave after I saw how the eyes came out. :)
After the jump, pictures from every angle!!!
Monday, January 6, 2014
Woods! I need more Woods
So I've been thinking, I have made a ton of urban scenery for my board(s), but I like the mysterious woods as well. Soooo, I needed some woods. I made a base and was getting ready to magnetize some tree trunks when I went to the GW store in Denver. There I saw the Citadel Wood.
Not exactly the coolest looking trees ever, but it would also save a lot of time and let me get something on the table quickly. So, "what the hell" I said to myself, and picked it up. It turned out to be not too bad, overall. The leaf attachments were not something I was interested in at all, but they looked like they would be very easy to paint and make look good.
I wanted each of the trees to look subtly different and even markedly different if possible. Walking through the forest, you rarely see two of the same trees. (Speaking as a North-easterner at heart... not desert forests, pine forests, birch groves etc...) They also needed to look semi alien, but very recognizable as trees. I did not succeed on the alien part, my forest-sense got the better of me :)
Basically, the trees and the base were primed with Valejo Surface primer, then I mixed Artist acrylic tube paints to make a suitable base color. A very light brown. After that I painted on Army Painter QuickShade dark tone. Yes, I painted it on, not dipped it. I wanted it to cover but be streaky and spotty at the same time. After that came many different dry-brushes with different Acrylic paints until I got three distinct, but decent looking trees.
The base was just primed, painted and then washed a bit. Then I hit it with a PVA/Water mix and stuck the flock down. The rocks were painted gray and then highlighted with black lightly to bring out their textures. Then the whole mess was matte finished to secure it all.
Even though it took months to actually finish, this was a really quick project in terms of time spent. Maybe a few hours all told?
So, if you're after some pretty easy woods bases for your boards, you could do worse. Not too bad of a kit. And just so you know, the trees do pop off the base so you can maneuver figures and hands through there more easily. They are good and tight fit, so they don't flop and fall down on ya.
More pics after the break... the jump break that is... it says "Read More >>" and it's down a bit :)
Not exactly the coolest looking trees ever, but it would also save a lot of time and let me get something on the table quickly. So, "what the hell" I said to myself, and picked it up. It turned out to be not too bad, overall. The leaf attachments were not something I was interested in at all, but they looked like they would be very easy to paint and make look good.
I wanted each of the trees to look subtly different and even markedly different if possible. Walking through the forest, you rarely see two of the same trees. (Speaking as a North-easterner at heart... not desert forests, pine forests, birch groves etc...) They also needed to look semi alien, but very recognizable as trees. I did not succeed on the alien part, my forest-sense got the better of me :)
Basically, the trees and the base were primed with Valejo Surface primer, then I mixed Artist acrylic tube paints to make a suitable base color. A very light brown. After that I painted on Army Painter QuickShade dark tone. Yes, I painted it on, not dipped it. I wanted it to cover but be streaky and spotty at the same time. After that came many different dry-brushes with different Acrylic paints until I got three distinct, but decent looking trees.
The base was just primed, painted and then washed a bit. Then I hit it with a PVA/Water mix and stuck the flock down. The rocks were painted gray and then highlighted with black lightly to bring out their textures. Then the whole mess was matte finished to secure it all.
Even though it took months to actually finish, this was a really quick project in terms of time spent. Maybe a few hours all told?
So, if you're after some pretty easy woods bases for your boards, you could do worse. Not too bad of a kit. And just so you know, the trees do pop off the base so you can maneuver figures and hands through there more easily. They are good and tight fit, so they don't flop and fall down on ya.
More pics after the break... the jump break that is... it says "Read More >>" and it's down a bit :)
Sunday, October 13, 2013
Laser Cut Card - Cyborg Sentinal (twin pack)
Hiya folks, Just a quick review of another FANTASTIC kit from Laser Cut Card. This one is the Cyborg Sentinel Twin-pack. As you may recall, I built the previous incarnation kit, the Monolith and I was thoroughly jazzed with it. Well, this kit is even, and I mean A LOT better!!
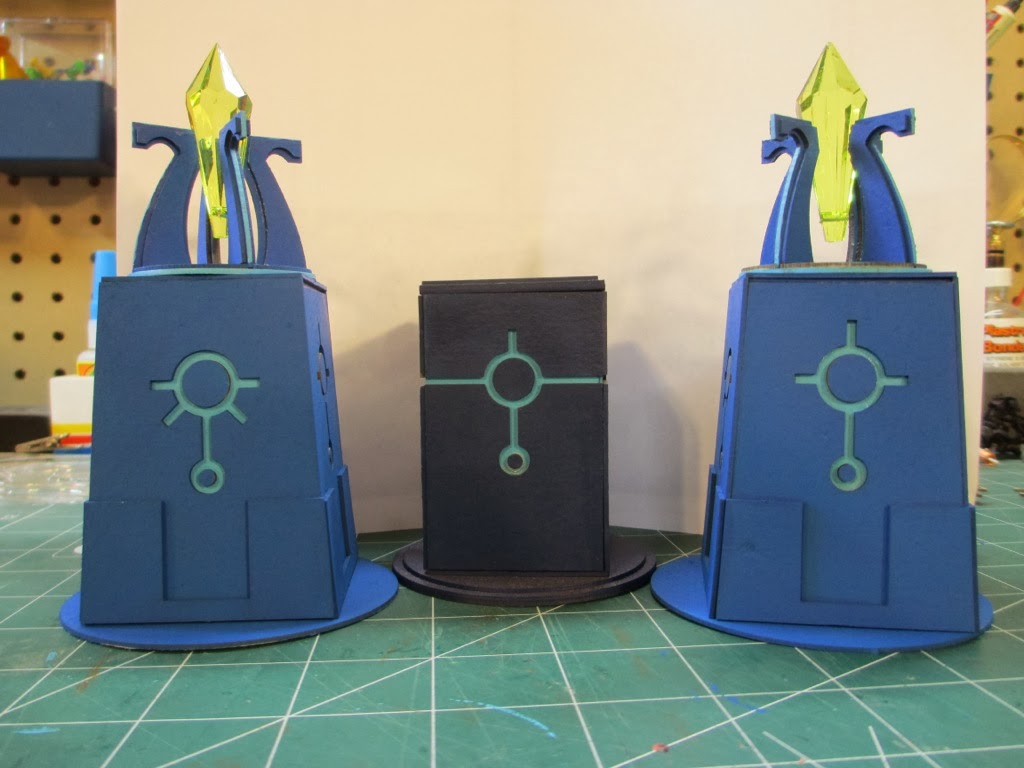
As you can see in the pic right here, the Sentinals have a nice angle to them, unlike the monolith, which is a square. Also, gone is the cardstock crystal, replaced by the green power crystals that mount into the holders perfectly. The package comes with 2 complete Sentinals, as you see here. Ingenious cut outs in the 'sprue' allow the crystals to ship relatively flat in the package.
Assembly is dead easy, even more than the square monolith. I like the fact that all the stuff in the symbols on the sides is 'backed up' by a small piece of card that you glue in. You can see it in the pic below. That means the highlight painting is even easier on this kit!
As you can see in the pic right here, the Sentinals have a nice angle to them, unlike the monolith, which is a square. Also, gone is the cardstock crystal, replaced by the green power crystals that mount into the holders perfectly. The package comes with 2 complete Sentinals, as you see here. Ingenious cut outs in the 'sprue' allow the crystals to ship relatively flat in the package.
Assembly is dead easy, even more than the square monolith. I like the fact that all the stuff in the symbols on the sides is 'backed up' by a small piece of card that you glue in. You can see it in the pic below. That means the highlight painting is even easier on this kit!
Tuesday, October 8, 2013
Laser Cut Card Objective Markers - Necron
Well, Neal from Laser Cut Card did it again! Another home run in the Necron coolness department. These are some dead simple objective markers for themed for a Necron force and they are just great.
What makes them so great? Notice the dice in the midst of the marker. This is a great way to show what mysterious terrain you are in. You can just roll the die, set it into the marker and voila, instant remembering. I have the GW munitorium objective marker sets, and I like the stands and the dice, mind you, but the color and contrast makes them damned hard to read.
These markers are pretty big, but not overly so, you can see the size in relation to a die. One side has the normal spread of number 1,2,2,3,3,4 while the other side has a generic Necron emblem. They are three layers thick of the heavy duty card Neal uses, so there is very little chance of the die getting bumped or jostled out of the marker during a game. If you're tough enough to knock the die out of it, you're probably a rage-quitter... seek professional help :)
Thursday, August 8, 2013
The new game table - awesome sauce!
Yep, this is awesome filled with awesome sauce, with awesome sprinkles on the top.
Ok, maybe that's over the top, a bit. Or alot.
You see, I am a wargamer by nature, I mean the cardboard counters on paper map type gamer.(Boardgames... ala GMT Games, Compass games etc.) My friend, Mark, and I have a regular Wednesday game going on at both our houses. 2 weeks we play at his place, the next two week at mine. Part of the problem is that we play big, long games, and it chews up real estate in the hobby/game room.
Well, not long ago, Mark got a spankin new game table from Geek Chic, but that was a little too much green for my tastes. Grand old table, I must say, but I am a minimalist at heart and my goals were quite a bit different;
When all was said and done, it came in for well under $500 and we actually had fun making it.
What follows is the picture and text reference of how it went. Hope you like.
Ok, maybe that's over the top, a bit. Or alot.
You see, I am a wargamer by nature, I mean the cardboard counters on paper map type gamer.(Boardgames... ala GMT Games, Compass games etc.) My friend, Mark, and I have a regular Wednesday game going on at both our houses. 2 weeks we play at his place, the next two week at mine. Part of the problem is that we play big, long games, and it chews up real estate in the hobby/game room.
Well, not long ago, Mark got a spankin new game table from Geek Chic, but that was a little too much green for my tastes. Grand old table, I must say, but I am a minimalist at heart and my goals were quite a bit different;
- I wanted to build it
- I wanted to steal the idea of the inset table with a topper to save/protect the game in progress
- Under $750
- Had to be 4' x 6' so it would fit my Realm of Battle and other terrain tiles!
When all was said and done, it came in for well under $500 and we actually had fun making it.
What follows is the picture and text reference of how it went. Hope you like.
Sunday, May 12, 2013
Review - Laser Cut Card 'Cyborg Monolith' - Awesome!
I have had this card stock kit from Laser Cut Card for a while now, just have not had time to build it. Boy am I sorry, this is great stuff.
I had a Sunday night off (no mothers day here, we're monster-less :) so I looked for something to knock together. There on my desk was my envelope from South Africa (where Laser Cut Card resides) and I decided to do it.
It looked slightly intimidating at first, but reading through the steps on the instructions at the website made it look easier. I have to say that Neal must have put a great deal of thought into his design, because it goes together without a hitch. Super simple, easy to build and very forgiving of a guy with little manual dexterity and lacking modeling talent.
The instructions on the website are clear and concise, but they lacked any information on painting. That kinda sucked 'cuz I spent quite a while looking. In the end I decided just to airbrush regular acrylic paint onto them. It seems to have worked well, but we'll see if there is any warping as the paint sets overnight. I am betting it won't, or I'm sure Neal would have warned users not to do it.
Hint - If he says to do or not do something, he means it. Tolerances are very tight and everything fits well if you 'do it his way'. I won't bore you with tutorial steps on assembly, I'll just put in some pics showing where I deviated because of the paint job I wanted on mine.
All in all, I give this kit a big A or 9.5 (I hate giving perfect scores, it tends to cheapen the scale, I think). It went together, paint and all, in just a couple of hours. A sharp knife and some super glue is all you really need for a great looking terrain piece / objective for your Necron game table. Easy to build, fun to build and paint, what more can you ask for?
I am now totally looking forward to building the 'cyborg defense line' for my next game, since I really haven't painted my Aegis defense line yet...
Pics Follow....
I had a Sunday night off (no mothers day here, we're monster-less :) so I looked for something to knock together. There on my desk was my envelope from South Africa (where Laser Cut Card resides) and I decided to do it.
It looked slightly intimidating at first, but reading through the steps on the instructions at the website made it look easier. I have to say that Neal must have put a great deal of thought into his design, because it goes together without a hitch. Super simple, easy to build and very forgiving of a guy with little manual dexterity and lacking modeling talent.
The instructions on the website are clear and concise, but they lacked any information on painting. That kinda sucked 'cuz I spent quite a while looking. In the end I decided just to airbrush regular acrylic paint onto them. It seems to have worked well, but we'll see if there is any warping as the paint sets overnight. I am betting it won't, or I'm sure Neal would have warned users not to do it.
Hint - If he says to do or not do something, he means it. Tolerances are very tight and everything fits well if you 'do it his way'. I won't bore you with tutorial steps on assembly, I'll just put in some pics showing where I deviated because of the paint job I wanted on mine.
All in all, I give this kit a big A or 9.5 (I hate giving perfect scores, it tends to cheapen the scale, I think). It went together, paint and all, in just a couple of hours. A sharp knife and some super glue is all you really need for a great looking terrain piece / objective for your Necron game table. Easy to build, fun to build and paint, what more can you ask for?
I am now totally looking forward to building the 'cyborg defense line' for my next game, since I really haven't painted my Aegis defense line yet...
Pics Follow....
Sunday, April 7, 2013
Something DONE! - Manufactorum and Night Scythe
It's a Christmas miracle... well, an April miracle? I actually have things done for a change. While I would love to take all the credit, my wife stepped in and did some.
My wife offered to help paint stuff, and since she is quite good anyhow, I figured how could I go wrong, right? So I gave her the manufactorum I built from the Imperial Sector set. Wow, did she knock it out of the park. It looks so good, pictures don't seem to catch the subtle shading. My lousy photo skills make it seem clunky and blocky, but it looks smashing!
I can't wait to base this with some rubble and make it look great. It will be a grand addition to the tabletop!
My wife offered to help paint stuff, and since she is quite good anyhow, I figured how could I go wrong, right? So I gave her the manufactorum I built from the Imperial Sector set. Wow, did she knock it out of the park. It looks so good, pictures don't seem to catch the subtle shading. My lousy photo skills make it seem clunky and blocky, but it looks smashing!
I can't wait to base this with some rubble and make it look great. It will be a grand addition to the tabletop!
Subscribe to:
Posts (Atom)