Showing posts with label Terrain. Show all posts

Tuesday, July 19, 2016

Baleful realmgate #1 - done

Hey guys,
  Finished up a realm gate last night, thought I might share.  I like the way it came out, but I am kind of biased...

  Went with a bleached  stone effect, but used the Duncan Rhodes video as my guide (my date with Duncan, heh).  First time trying the glowing effect, I think it came out ok.


Let me know what you think!

Monday, October 26, 2015

New Walls. For Sigmar or Warmachine

  Well, with all those new Tau moving walls running around, I thought I would cobble some together for my Age of Sigmar and Warmachine games.  Super easy to make, the process is actually in the Warmachine rulebook.  You just cut a small piece of insulation foam, I went with 1/2" by 6" and 8".  They are, of course, 1" tall.  Then I rolled up some tin foil into a ball, to get a nice textured surface.  Press that into the foam, then use a ballpoint pen to draw in the 'mortar' lines for the stones.   For the base, I just cut some dollar store foam core board into shapes, peeled off the top layer of paper, cut a 1/2" groove in it and removed that foam as well.  Then used Elmer's glue to put them together.

  After that just paint and detail to your heart's content.  I did some grey and some umber walls, just to have some variety.  I had the hay bales just laying around from some other project.

  Making them in 6 and 8 inch segments means I can arrange them however I like.  I made some "forts" below just for examples sake.

  Making all 6 took about 2 hours, not counting paint drying time.  Simple, easy sunday project.


Thursday, August 13, 2015

Age of Sigmar - WIP 2, now with terrain

  Who knew, something like Age of Sigmar could get me fired up to paint again? 

  But it did, and I am.  Here are my Retributors, almost done except for basing and some highlighting.  I know, I'm no Duncan Rhodes :)

  I do try though.  Getting a little better at the highlighting, but I have to work on my brush control a lot!!


  I also started work on a terrain piece of my own design.  Ages ago, I cut up some foam board into little blocks on the band saw.  I was going to make a castle for a D&D game, but got sidetracked.  I stumbled on these and thought, hey, there is a ruined building in there!  It's glued down and basecoated.  Needs a bunch of paint, details and texture still, but it is a start!  Generic enough for D&D, WH40k and AoS now...

On with the pics... let me know what you think, try not to laugh to hard :)


  Going for the gold armour, green details, in case you weren't aware...  I love the citadel Liberator gold layer paint, new for the Sigmar release.  It's very smooth and VERY gold, perfect highlight for the Retributor Armor gold paint.  I guess they planned that.  heh heh he.  On with the ruins;


  Reasonably simplistic, but I think it will look good once it's painted up and debris/grass/wood tossed around.

  See ya soon!  Play more games! (thank Wil Wheaton!)

Friday, January 30, 2015

New F.A.T. Mat arrives...

  Wow, sorry for the lack of updates lately.  Been really busy and involved with things.  Stuff has been happening thought, so next up is the latest F.A.T. Mat from Frontline Gaming!  Boooyeah!  I had some money come in from selling my AT-43 minis on e-bay,so I just had to get the cityscape.  This new incarnation is great, follow along with me...


  So I ordered the Urban Combat mat and boy is it sweet.  The graphics are just beautiful and it has an overall feel that just feels right.  Another thing I noticed, there are 'rows' of lights imprinted that seem to be pretty close to the Vanguard Strike deployment area.  I have not measured it, but it looks pretty darn close, and if I know Reece and the frontline guys, that is something they would do.

  So, pictures follow, along.  And stay tuned for a Laser Cut Card post very soon.  Finishing up a build for some great new pieces from them!!


   On the left is the new mat in the new case, MUCH nicer than the old one and it has a shoulder strap as well.  Bingo, hit that one outta the park!!

   The art and level of detail is fantastic on these things.  This will be a joy to play on!
 Close up of the detail, just amazing.
 See those lights?  Pretty sure that's Vanguard Strike!
   The thickness and durability of the mat.  You are not going to tear thing or hurt it unless you really mean to.
  At home on the overhead FATMat storage rack.  The alpine and galaxy map are it's battle brothers!

That's all for now.  Thanks and stay tuned!

Sunday, July 27, 2014

Etched Glass, A building and The Battlestar Pegasus

Wow, crazy times.  And I just had a power failure... so it gets even crazier.

Just wanted to share what I have been working on lately, and by lately I mean the last two days.  With work, traveling to Hawaii (for work) and a myriad of other things, I have been not as busy as I want to be lately.  I also have to admit that I have been working more on the model railroad lately too.  Resurrected that blog too...  But I'm trying to get back to the 40k stuff!...  Here are some projects that came in lately...


First up, my air etched glass.  The logo was a one-off stencil that my wife drew up for me.  I used my new air eraser brush from Master (link to amazon here).  I think it came out very nice.  It's the logo of my space marine chapter.  (But I have to admit, I'm getting all Orky over here...).

I used the aluminum oxide powder that came with it to etch the glass.  This is my very first effort ever, and I think it came out pretty well, for the first try ;)

You have to turn the air pressure up pretty high to get this to work, and I was afraid it might peel up the frisket, but it didn't budge at all, even at 60 psi.

So, I guess I know what everyone is getting for Christmas around here ;)


Next up, was the painting of the Battlestar Pegasus.  I know, I know, it was the Battelstar Galactica that got all famous.  But I liked the old storyline with Commander Kaine and the Pegasus, so mine is the Pegasus... Only things left are the engines, decals and clear coating...


And last but not least, The building I built so long ago is finally getting some love.

Here it is, all grey coated.  I have to say I got motivated by Duncan Rhodes' video on painting buildings, so I am going to try his methods.


   The building is pinned at each level, so that I can use the floors individually or gang it all up into one big ruined building.  Still thinking about whether or not to add a base to the bottom.   Later today the wash goes on.  Looking forward to trying my new mix of Payne's Gray wash.  Hope it works :)

  That's all for today, see ya soon!

Saturday, February 22, 2014

Frontline Gaming's TableWar Mats - awesome

  Yes!!!  Finally I have the second (in my life) kickstarter that has actually worked!  Frontline Gaming's Tablewar Mat Alpine  arrived yesterday (Friday 22 Feb).  I have to tell you, I am so damned impressed it's crazy.  This things is way better than I imagined.

  I have heard about this thing since Reecius announced it on a podcast I was listening to (I think the Independent Characters, but don't quote me).  It sounded like a great idea then, so I jumped on the Kickstarter as quick as I could.  As always, I have some trepidations with kickstarters, since a lot of them seem to start out really well, then kind of fizzle out.  Not so with Reece and Frontline gaming.  Awesome communication through the whole process, I NEVER felt like my money was gone.

  But back to the Mat itself.  This thing is the cat's meow, the bee's knees, the serious shit for anyone who plays miniature games!!!  If you went to the LVO, you played on these mats, or at least saw them.  I couldn't go, so I was pretty green with envy toward the folks that did.  But true to their word, as soon as the Frontline guys got back from LVO, they hustled all these mats to the shippers and now I have mine.

  Imagine a HUGE, 4 foot by 6 foot mouse pad and you have the idea.  They are not super thick, but they are very sturdy feeling.  The graphics are just gorgeous, they look amazing on the table.  Trust me when I tell you, you will be proud of owning these things.  I only have the Alpine board, but I can guarantee I will be getting others.  Let me load up the pictures and describe them to you... hang on...

   So, here is a quick look at what the terrain looks like.  They are truly a sight to see.  The top is the kind of cloth that you see on mouse pads, very thick and durable.  A sharp piece of terrain or a few dropped minis are not going to rip or tear this thing, no way.  It also makes a GREAT surface to roll dice on.  Very quiet, but the dice roll, they don't just stop.

Sunday, October 13, 2013

Laser Cut Card - Cyborg Sentinal (twin pack)

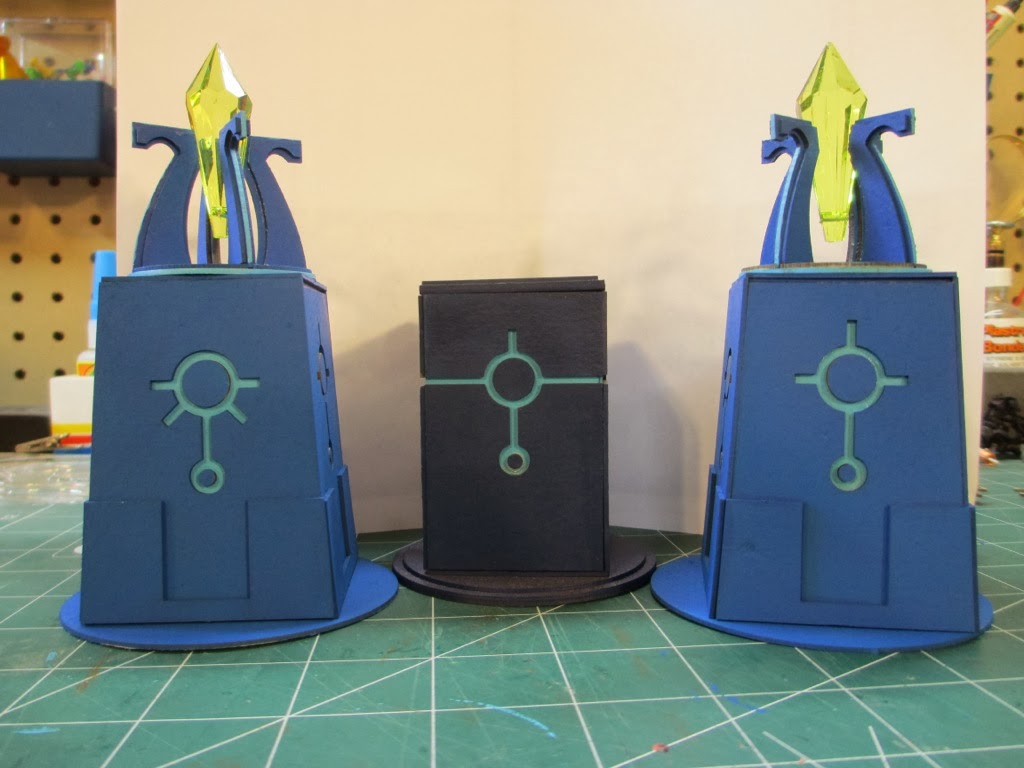
  Hiya folks,  Just a quick review of another FANTASTIC kit from Laser Cut Card. This one is the Cyborg Sentinel Twin-pack.  As you may recall, I built the previous incarnation kit, the Monolith and I was thoroughly jazzed with it.  Well, this kit is even, and I mean A LOT better!!

  As you can see in the pic right here, the Sentinals have a nice angle to them, unlike the monolith, which is a square.  Also, gone is the cardstock crystal, replaced by the green power crystals that mount into the holders perfectly.  The package comes with 2 complete Sentinals, as you see here.  Ingenious cut outs in the 'sprue' allow the crystals to ship relatively flat in the package.

  Assembly is dead easy, even more than the square monolith.  I like the fact that all the stuff in the symbols on the sides is 'backed up' by a small piece of card that you glue in.  You can see it in the pic below.  That means the highlight painting is even easier on this kit!


Thursday, August 8, 2013

The new game table - awesome sauce!

  Yep, this is awesome filled with awesome sauce, with awesome sprinkles on the top.

  Ok, maybe that's over the top, a bit.  Or alot.

  You see, I am a wargamer by nature, I mean the cardboard counters on paper map type gamer.(Boardgames... ala GMT Games, Compass games etc.)  My friend, Mark, and I have a regular Wednesday game going on at both our houses.  2 weeks we play at his place, the next two week at mine.  Part of the problem is that we play big, long games, and it chews up real estate in the hobby/game room.

  Well, not long ago, Mark got a spankin new game table from Geek Chic, but that was a little too much green for my tastes.  Grand old table, I must say, but I am a minimalist at heart and my goals were quite a bit different;

  • I wanted to build it
  • I wanted to steal the idea of the inset table with a topper to save/protect the game in progress
  • Under $750
  • Had to be 4' x 6' so it would fit my Realm of Battle and other terrain tiles!
  So, the wife and I, with lots of wood tools and a little skill set to designing a game table.   

  When all was said and done, it came in for well under $500 and we actually had fun making it.

  What follows is the picture and text reference of how it went.  Hope you like.

Monday, August 5, 2013

Mysterious Terrain - The Dead Pools


  Hey guys, sorry for the lack of updates lately, but it was a crazy week.  The big news is that my new gaming table is almost done!  That will be a huge post all by itself, so I shant dwell on that.  I have done a lot of side work though...


  • I set up a KanBan board (thanks to Carl at Independent Characters for that one...)
  • I started a forest piece (with magnetized trees, more to come)
  • I built a crap-ton of Eldar and got some of them primed...
  • And I built some mysterious terrain pieces (maybe lethal terrain even!)
  Now, in the spirit of total transparency, I stole this idea directly from Nick at IDICBeer.  He has a GREAT YouTube channel and blog, I recommend you check it out.  He has a ton of great tips and tricks and he is very easy to listen to in the background.  Here are his links;

  In his video about lethal terrain, he covers how to make this effect using PVA glue and super glue.  The two have a chemical reaction and the result is very interesting.   The glue looks like it is boiling up after it dries, very cool.  But in his video, he was able to just pour the glue onto the cardboard and it stayed in place.  On my first attempt, I had Elmer's glue all over hell and creation.  I knew I had to change tactics.

  So here is how I changed Nick's idea, just a tad.  I won't say improved, I will just say changed.  here goes.

Saturday, July 13, 2013

Realm of Battle - Expansions done, now with charnel pools!

  It is coming...  after all.  My Apocalypse Collectors version really did make the cut at the last minute and is winging it's way here.  A more thorough review of the box when it arrives.

  Today is another chapter in the Realm of Battle board saga.  I bought the extensions some time ago from my FLGS (Active Imagination) and they sat, languishing in the corner.  A couple weekends ago, I decided it was time to get them ready for Space Wolf corpses, so I had better get to it.

  So here it is, in pictures...


The boards, primed in white acrylic primer and the rocky areas sprayed with Black.  The primer is any cheap acrylic primer from a hobby store (Hobby Lobby or Michael's ...), no need to wasted Valejo or <god forbid> citadel primer on this.  Scuff up the boards a bit too with really light sandpaper (after you wash them in water and dish soap, like you do with all your plastic minis, right?)
 

  The two boards after having been painted with acrylic tube paints (thinned with tap water, no special care needed here).  I used umber/sienna colors to match the theme of the old boards.  This step helps in case you get a divot or ding in your flocking.  I tried to roughly feather the colors out from the black to the lightest shade, but having variation and hard lines no and then does not hurt.  If you ever look at "real" terrain from high above (i.e. an aircraft) you'll see that nature is made up of some blends and some very hard lines.  You'll also notice that even in the most unending 'boring' terrain, there is a vast amount of texture and hue difference.  Even flying over Kansas wheat fields you see marked differences in the texture and color beneath you.

   Again, a closer shot just to see where I airbrushed some paint for fun, brushed and generally played around with it.

Sunday, February 3, 2013

Pegasus Hobbies Terrain

  Quick note on something I found at my FLGS (Active Imagination) Friday night.  These are snap together kits from Pegasus Hobbies that go together rather quickly and easily.  I am including a pic of the of the box, the completed power plant and the plan next to my unpainted Manufactorum.  As you can see, these are not GW terrain pieces by any stretch of the imagination, but they are very cool pieces in their own right.  They have a very good, 40k-esque look to them.  I think, with some seam work, mold line work, some glue, primer and paint, these will rock.

  Also, in their favor, they are completely modular.  If you were to get another kit, they would fit right together and you could build an even bigger complex.  I am thinking about doing just that.  Anyhow, just a quick note on these.  Very cool, and a decent alternative to the standard GW Terrain pieces.