Showing posts with label hobby. Show all posts

Thursday, December 13, 2018

Building the Astraeus Super Heavy Tank - Forgeworld


  So.  I did a thing when I went to the GW New Hobbyist Expo in Texas.  I bought a Thunderhawk.  Yeah, needed that like another bolter shell in the head.  But I have always wanted one, so I did it.  To lessen my feelings of guilt and shame, I made myself swear to finish the Astraeus I got for Christmas first.  So herein lies my tale of building the model and how the new ForgeWorld kits are.
Overview
  First off, let me say this.  This kit is a HUGE hunk of Resin and the quality difference between now and just a few years ago is amazing.  Nothing was warped that had any size to it.  A couple of gun barrels, and the main gun barrels needed a little straightening, but it was by no means like it used to be.  If you used to be apprehensive about buying ForgeWorld big ticket items, don’t be anymore.  This kit and the Thunderhawk are beautiful, detailed and needed almost no re-working at all.

  Next, assembly gaps.  Yes, there are gaps in the finished product.  You will have to green-stuff or putty little joins here and there.  This is a fact of life with these resin kits, and I’ll not devolve into the merits of resin v plastic.  These are fun models that need a bit more hobby proficiency than the shake the box kits that GW makes.  But half the joy is in the assembly, so it’s kinda what I paid for at least. 
  The new manuals for assembly are about 3257% better than the old photocopied crap instructions that used to be in these kits.  The new manuals are full color, they show the parts very clearly.  They also take care to overlay colors onto the areas you should glue, and areas where resin will need to be removed to make it look or fit right.  There are also notes and callouts where the assembly can be fiddly, or where something needs to be done to make the final piece have movement or elevate properly.  

  So, the grade for the kit overall is a solid A

Assembly notes.
  I would suggest magnetizing all the weapon options for the tank in a big way.  It’s nice to have options and this is resin, it’s easy to drill the holes and easier to mount the magnets.  If you don’t have the magnets, I would suggest either MagSavvy.com or the MagnetBaron.com.
  I also magnetized the sponsons into the side of the vehicle.  The fit is a little loose overall, and I did not want to glue the sponsons in.  The assembly itself has ‘ridges’ in the holes for the sponsons and the sponsons have splines that will hold them in different elevations.  They are reasonably thick, but I preferred to put a magnet in there to hold it better. 

Turret weight
  The turret is the first thing you build and it needs a few tweaks, at least mine did.  The weight of whole assembly is definitely toward the rear, and the guns are not long enough for the moment of inertia to equalize the weight.  So, they tend to slam down and always point up.
  Since friction is really cool, all I did was take some very thin plasticard (.10) and made 2 sleeves for the gun turret ‘holes’ to tighten it up and hold the guns in any position I put them.  See the picture. 


Glue…
  So, for most of the large body assemblies, I used bamboo skewers as ‘pins’ (the ones I have are nicely rounded and have a 3/32” diameter).  It was easy to drill with my Tamiya drill and then used 5 minute epoxy to glue it all up.  For almost all the littler pieces I just used thick super glue.
  Keep in mind that you’ll need to ‘score’ the mating faces no matter which glue type you use.  I just used an x-acto hobby knife to make lines in the faces.  It gives the glue (or epoxy) an extra surface to bite into as it dries and sets.

All in all, assembly was really easy and straightforward.  I’d have to give it a solid B+.  The manual and the new, clean lines without warpage made it a breeze and done in a couple of evenings.


Painting
  I left off all the repulsor plates, the engines and weapons.  These will be primed separately and be painted then applied.  Hopefully, I’ll get to show you a painted version soon.
So overall, the whole thing gets an A.   It’s a great kit.

Friday, November 30, 2018

The care and feeding of brushes, and how to fix them when you don’t.


Using your brushes so that they last a lifetime.

  We all know that we need to care for our brushes, but after seeing some things recently, I have come to understand that there are a lot of people who don't know how to just that yet.  So here are my guidelines for how to care for your brushes, and what to do if you don't sometimes...
  These are guidelines, not rules to live by.  We all have habits, some bad and some good.  These are really just things to think about was you use your brushes.  I would, however, say things in the ‘never’ list you really should try to avoid doing.

       Always

o      Use a brush for one medium only.  Don’t use the same brushes for oil paints (or oil washes) and then acrylics.   The stuff used to clean oil brushes is pretty harsh (mineral spirits) and will really wear a brush out. 
o      Always wet a brush before you start painting.  Don't pick up paint with a dry brush.Unless you're dry-brushing, of course.
o      Once a brush is charged with paint, begin painting with it immediately.  This will pull the paint away from the ferrule.
o      Once you have rinsed a brush, shake out the excess water rather than rubbing or squeezing it out with a cloth or paper towel.  Never pinch and pull on the tuft with a towel, as this will break or pull out the hairs.
o      Wash and shape the brush hairs when you finish your work session, using lukewarm water and a commercial artists' brush cleaner (links below)
o      Treat synthetic brushes with the same care as natural hair brushes.  The rule to never rest a brush on its tip is even more important with synthetic brushes since they tend to retain any shape they get into.
o      Dip out and mix paints with an old brush or stick, never your best brushes.  If you’re mixing on a palette using your good brushes, just be sure not to get paint up in the ferrule.  

       Never

o      ‘Reshape’ a brush with scissors or X-Acto blade.  Trimming the ends of a natural hair brush leaves them in a 'broken' state and they will never get back to 'normal'.
o      Never hold a loaded brush with the tip pointing upwards.  The paint will ‘wick’ towards the ferrule and make it harder to clean.
o      Leave a brush sitting point down in water
o      Leave a brush wet with paint for extended periods
o      Let it dry out with paint on it especially in the tuft (or ferrule)
o      Clean or rinse a brush in hot water.  Hot water can affect the glue up in the ferrule and allow the hairs to pull out or get misshaped.
o      Avoid submerging the tuft in paint for long periods. This encourages the capillary action that causes paint to migrate up the hairs into the ferrule, where it is difficult to get out.
o      Do not submerge the brush in water beyond the top of the ferrule. Water will seep into the ferrule from either end.  This could cause the handle to swell, crack, and loosen in the ferrule.

Cleaning brushes correctly

  Cleaning is really straightforward, but if you’re not doing it right, you can really ruin brushes fast.  The cheaper the brushes, the more they get affected by bad practices.
       Never use hot water!  (see above)
       Use a purpose-made brush soap (Masters or Jentastic Goop), baby shampoo or something super gentle.  Never use hand soap or harsh cleansers.
o      Get the brush good and wet with water, swirl it in the soap until it lathers up a bit, then brush it in the palm of your hand to ‘scrub’ the bristles.  Never jab it or move it in a motion that would go against the ‘grain’ of the hairs.  Always be ‘pulling’ it toward the natural lay of the hairs. 
o      Rinse the soap out carefully in water, swirling it around for a while. 
o      Once cleaned, shake excess water from the brush.  Don’t dry a brush by wiping the tuft with a towel.  If necessary, shape the brush gently against the side of your finger so that it comes to a balanced point. Wash brushes need to be shaken out more assertively, as they hold more water.
o      If you’re crazy like me, now is the time to dip it into some hair conditioner (you’re wife’s bottle is probably in the shower, go grab a small squeeze of it in a small seal-able cup.  She won’t mind.)  Seriously, brushes are just animal hairs, and they dry out.  Conditioner helps them

Remedies - When you don't follow the 'guidelines'

  A good brush is always worth the investment. Not only is the finest quality, natural hair brush a joy to use, it can always be returned to its original state no matter how bad you treat it.  Cheap ‘box store’ brushes are not so forgiving.  Everyone I have met who swears by cheap brushes changes their tune when they start using quality brushes.
  That said, poor care and use of brushes can lead to them getting really hard to use.  Most often, the head of a brush will start to splay as pigment becomes trapped between the hairs in the ferrule.  This is what normally keeps them from holding a good point.  This will occur if paint is not thoroughly washed from the brush after every use, or the brush is used too aggressively to pick up or apply paint.  There are ways to fix this though!
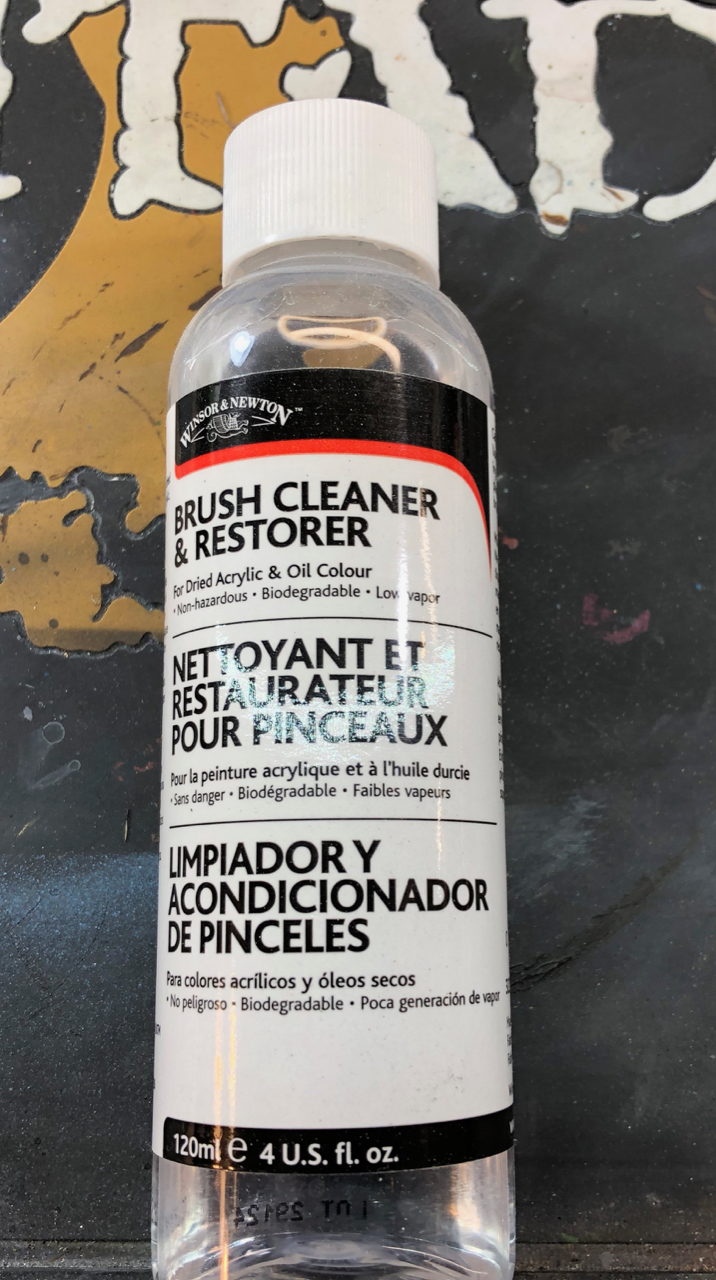
   Winsor & Newton sells a brush restorer chemical that is designed to ‘gently’ eat the paint that has dried in the ferrule.  I have used this stuff with great success on even some of the most abused brushes (Elric!).  All you need to do is put the brush into the bottle of cleaner (or a separate container, see the photo.) up to and a little past the ferrule.  This will let the cleaner fluid work the dried acrylic out of the brush.  They recommend soaking the brush for hours or even overnight if need be. 


  Once it has soaked for a decent period of time, run through the cleaning cycle.  Use clean water, brush soap and gentle scrubbing.

Hair conditioner

  As brushes are used and cleaned in normal painting, the natural oils in the hairs are worn or washed away. The usual symptoms are that the hairs will begin to look dried out or frizzled, the brush will not point as promptly when wet, and stray hairs begin to appear.   Some folks will use brush soap and actually leave it in the bristles without washing it out.  Let it dry them in an hour or so, rinse it thoroughly.  Most times that will work to recondition the brush.
  You can also wet and wash the brush in lukewarm water and then apply a small amount of hair conditioner to the wet clean hairs, work it in thoroughly with your fingertips, shape the brush to a point or flat edge, and let it sit for an hour or so. Thoroughly rinse out the conditioner and shape the brush to dry, and repeat if necessary.

Brush shaper or Gum arabic.

  After washing, if the hairs or bristles are still crazy splayed out, you can use gum arabic or brush shaper to shape the brush back to a point (most natural hair brushes come preshaped with gum Arabic on them and need to be cleaned before use).  Dip the brush in the brush shaper or gum arabic solution, shape with your fingers, and set it down where it can rest undisturbed to dry.   The longer it sits, the better the result will be.  Keep in mind though, if there is dried paint in the ferrule, it will not stay pointed for long after this treatment.  Go back to the remedy section.

Stray hairs.

  Almost always, just leave these alone, as long as the brush shapes to a good point and the strays do not interfere with your brushwork.  If you need to remove a nuisance hair, grip the hair carefully with thumb and finger, or a pair of tweezers near, the visible base (not the tip) of the hair shaft, pull it down and to the side against the edge of the ferrule, and snap it off at the edge, using the ferrule edge to cut it.  Try not to ‘pull it out’ from the ferrule, as it will leave a tiny bit of a hole in the glue and allow gunk to build up.  Don’t try to cut stray hairs with scissors or a blade, you won’t be able to trim it close to the ferrule without damaging the tuft.   
  Never attempt to "trim" stray hairs by holding the dry brush tuft near or against a flame. This will very likely burn off other hairs in the tuft and can invisibly blunt the tips of the hairs in the point as well.

Storage

o      Never store a wet brush upright, the liquid will just wick up into the ferrule and that’s never good.  Leave the brush horizontal or face down (not resting on the hairs) to dry, then store them upright.
o      Never store a damp brush in an airtight container. The dampness will cause mildew, and that will destroy the brush hairs.  Baaad!
o      Don't store brushes near heat (furnace vents, sunlit windows).  Heat is not a brush’s friend.

Traveling with brushes

o      To carry brushes on trips, use a brush roll holder or something expressly designed for that purpose.  Lots of companies sell roll up or zippered pocketed holders for brushes.  Tossing them into a box may not always be the best answer, they take a lot of abuse banging around like that.
o      Once home, brushes should be immediately unpacked from the holders, cleaned, shaped and dried in the usual way.  (Unless you already did it on your trip…)

  Always remember, once a brush is useless for one purpose, find something else for it to do.  Maybe it becomes the brush you use to pull paints out of a pot, or mix on your palette?  Maybe it becomes a new drybrush?  
  So there you have it, just an average painters ideas about taking care of your brushes.  Do you have to follow this like law?  Hell no, nobody would, but if I manage to change one bad habit, my work here will be done!

Wednesday, November 21, 2018

The mini painters drying/curing chamber

   So, I made a thing. It’s a thing almost nobody needs. The thing is, when you need this thing, you need it like nothing else ever. (Everyone needs a Thneed…)
   Yes, I present the miniature painters drying/curing chamber. In a nutshell, this is just a very low power heater and two computer fans in a box. The low power heater is just there to provide a LITTLE warmth, but not necessarily heat. The fans are the key part, since acrylics dry more with air movement than heat. (It’s an evaporative process…)
   The one I built is proof of concept, and it works. It is neither pretty, nor does it use the best materials. I am certain there are far better choices for materials out there, feel free to experiment and tell me all about it. I would love to do a version 2!
   This is not a step by step tutorial, but rather a series of ideas stitched together with pictures. You’ll get the idea as we progress.

What you need

  • A box to be the chamber. I used a “Really Useful Box” in the 9.1 liter size. I chose it because it had nice straight sides to mount the fans on and it also fit the size of the heater nicely. $12.00
  • A power transformer of 12VDC or less. You can find these labelled as ‘chargers’ all over the place. You probably have some in a drawer somewhere that you can’t recall what they charge. The output has to be less than 12v DC but more than 5v DC. The fans normally look for 12 VDC but will also work on 5 VDC at a much slower speed. I found one that was 8.7VDC. You will cut the end off, so make sure you don’t need it for anything else.

  • 2 Computer fans – I used 80mm fans I got from Best Buy for $6.99 each. You don’t want super-fast rotational LED lit OMG fans. Just cheap 12v computer fans. (More on why later)
  • A reptile heating pad. They sell these at pet stores, they must be avoided at all costs!!!! The pet store markup is on average 300%. I found the same reptile heating pad on amazon (7w) for $9.99 while at the pet store is $39.99. I went with 7W because it is low heat and won’t burn the plastic box, while still providing some ambient warmth in the box. Remember, we want warm, not hot.
  • A rack of some kind to set minis on. I used granny grating from a Hobby Lobby, you might find a nice metal rack or make something of your own… Be free, choose wisely! (Granny grating is the latch hook rug stuff you can find at craft stores in the yarn sections. It’s just plastic sheet with lots of square holes in it. Makes great basing and terrain material too. It’s about $2 for more than you’ll ever use ;)

You will need some tools as well.


  • A soldering iron to connect the wires on the fans and maybe the heating pad as well (if it has a regulator switch). If you are not handy with a soldering iron, you can use wire nuts from the hardware store and splice connectors from the same store.
  • A Dremel tool to drill the holes in the box. You could also use just a regular drill and bits, but the Dremel makes it faster.
  • A multi-meter. You need this to check the polarity of the wiring of everything. You can get them super cheap at Dollar stores, Wal-Mart etc. You do not need a Fluke $300 job, just one that shows volts DC.
  • A wild sense of abandon and experimentation…

A note on safety


YOU WILL BE WORKING WITH ELECTRICAL WIRES. NEVER SOLDER OR WORK ON ANY PART OF THIS WITH ANY THING PLUGGED IN TO A LIVE OUTLET. YOU COULD DIE!!!!!!!
Yeah, I know, safety warnings are lame, but seriously, make sure this stuff is unplugged before you do anything. Don’t be a Darwin award winner.

Assembly steps. Kinda…


   First up, measure and drill the holes for the fans on the opposite sides of the box. I drilled the first hole, started the screw to hold it in place then drilled the rest. One the holes are drilled, you’ll need to remove the plastic on the box for the fan to blow through. I found the easy way was to mark the opening for the fan, then drill a bunch of holes in the plastic, then used a hobby keyhole saw to “connect the dots”. I mounted my fans inside the box, just to make it easier to store and not worry about knocking the fans about. You do lose a little room, but it’s not a big deal.
 
   I also mounted one fan near the bottom of the box and one closer to the top. I ‘think’ it gives a little better airflow, but who knows. As you mount the fans, take a note of the direction of the airflow. Each fan will have an arrow on its case that shows which way the air flows through it. You’ll need to mount one fan to ‘pull air in’ and the other fan to blow the air out. This will make sure that all the air that goes through the box will flow across the minis in the box. 

   Next, you’ll need to install the heater. Mine has a big power regulator/switch about halfway up the cord. There was no way I wanted to drill that big a hole in the box, so I marked my cord and cut it. If you’re not seriously confident of your electrical skillz, just drill/cut a hole big enough for the cable then use duct tape to close it up. If you are confident in splicing/soldering the cables, just separate the 2 cords of the cable, mark it with tape in two places and cut away. The splice them together after you run it through the hole in the box. MAKE SURE IT IS NOT PLUGGED IN!!!!!
   Just place the heating pad on the bottom and either tape or hot glue it down.  Simple as that.  Run the cord out and you're almost home.
   Now, to wire the fans. This is fun. The fans will have a red wire, a black wire and a blue wire (normally). Red is positive, black is negative and the blue wire is not needed here. (It reports the fan’s RPM to the computer in case you’re wondering.) We want to but the wires off as close to the computer connecter as you can. Then cut the blue wire off and throw it away or save it for other projects. Also cut off the power transformer near the tip.
   This is where you need the multi-meter and SAFETY! Strip off some wire from each side of the transformer cable. Make sure the exposed wires stay separate (Tape them to your work surface so that they do not touch.) Plug the transformer in and use the probes to find the positive wire. (The red probe will be on the positive wire when the meter indicates positive voltage. If the meter shows a minus sign, switch the two probes until you see positive voltage (no minus sign)). Mark the positive side with tape and UNPLUG THE TRANSFORMER.
  Now, either solder the newly found positive wire to the two red wires or use the wire nuts to connect them. Do the same for the black fan wires and the negative wire from the transformer. Now is test number one. Plug the transformer in and make sure the fans spin, and that that flow the air correctly (one in, one out of the box).
   To make the shelf, I just cut out some Granny grating to fit the box, leaving a space for the fans. Then I hot glued that to five, one inch long dowels and set it in the box.
  Voila! You have a mini curing, drying box.

How to use it

   The nice part about having the dual plugs, one for fans and one for heat is simple. If you just want to dry wash or a layer of paint, put the mini in, put on the lid, plug the fans in and let the air current do the work. If you need to do a more serious cure, say green stuff, texture paints or some other thick stuff, you can add the heater to the outlet.
   The heater at such low wattage is not going to warm up all that much. Remember, it’s designed to not hurt a small lizard, so it’s just going to warm the air a tiny bit.
   But Bill, can’t you do the same thing with a blow dryer? Why yes, Jimmy, you can. But while you’re sitting there holding the blow dryer on your model(s), you’re not painting other models, or building, or taking the wife to lunch. It just saves time…
   Is it perfect, naaah. It is cool though! I love it for getting washes dried in half the time as usual, and for setting texture paints on bases in short order.
  Let me know what you think. (I already know I’m crazy, no need for that…)


Sunday, March 18, 2018

Assett Drop Subscription box - Quick look Video

A quick peak into the Feb 2017 Asset Drop box!  Very cool painting subscription box (like lootcrate, but cooler)


Saturday, December 9, 2017

In defense of the Battle Journal!

   Ok, my first post in a while that is not a video, but it still may become one...   I'm here today to defend a product.  A Games Workshop product.  Yes, we all know that I am the #1 defender of GW stuff, and that I may be slightly biased, but I'm serious.  And no, this is not a teary-eyed plea to "leave them alone".

  It is however, a plea to some in the community of 40k and AoS to step back and think about these books.  Most of the criticism I hear about these books is coming from folks who are good at the game they play.  If you're one of those, think about how you got good in the first place...

  I will venture to say that you did something along these lines...  You played a lot, you are (or were) young enough to have a good mind and memory for these games  You learned from your games and figured out how to not make mistakes with deployment, movement, positioning etc.  You also probably have a knack for this sort of thing.

  Now, put yourself into my shoes, or some newbies shoes.  Some of us don't have time to play 5 games a week, let alone 5 games a month. 

  For us mere mortals, having a record of what happened, what we did wrong (or maybe right) is huge boon to our gaming.  Some of us are learning new armies and are just starting to make new mistakes.  Having a place to record all these things is a huge help.  I'm trying to juggle my reasonably active work schedule, a podcast, occasional videos, NEO work etc.  I am also OLD and cannot remember what I had for lunch, let alone what I did wrong in game one of the Slobberknocker GT.  Having these books to jot down my notes and my mistakes is a huge help.

  I have often mentioned to James that what makes him so much better than me at AoS is that he never makes the same mistake twice.  I tend to do the same dumb things several times until I remember not to do it again.  Writing down my notes is helping me become a better player and a better opponent to the folks I see at tournaments. 

  So, all you good players out there, when you see me writing in my journal, trying to become a little bit better at the game, don't make fun of me.  (well, actually, go ahead, I don't mind.).  Just understand that this product is not aimed at you, it's aimed at me, the casual guy who wants to give you a better game one of these days.

  Oh yeah, and if you ever forget what turn it is, or who went first, expect me to call you out and laugh at you and make fun of you!!!  Because I wrote it down and I KNOW what turn it is ;)

Friday, November 10, 2017

Video - Wargamer Fritz update / How to make any kind of Texture paint

An update on the real reason Wargamer Fritz's channel was closed down, and how to make any colour texture / base paint that you want.  Enjoy!


Wargamer Fritz’s Blog/Podcast Page - http://www.wargamerfritz.com/

Nick (IDICBeer)’s Video - https://youtu.be/69S-aVKBZtQ

Also, see my Podcasts;


Tuesday, May 2, 2017

New Video series! - The Crucible Chaotica

Hey guys,  Just sharing a video from the new series where I will cover anything and everything hobby related.


Sunday, June 12, 2016

Improving your wet Palette

  Hey guys,  just a quick video on improving your wet palette.  Using some real artist tools makes a big difference.


Thursday, May 26, 2016

Molding an airbrush custom handle with Sugru


  Hey guys,

  Just wanted to share a quick post/tip.  I have a Sotar 20/20 airbrush and I love the comfort handle it has.  Unfortunately, neither my Iwata Eclipse or H&S Infinity have the same thing.  Then I thought about the packets of Sugru I have sitting around.  5 minutes later, I have a nice comfort grip on the brush.  It's actually better than the Sotar, because it is much softer.

  If you don't know, Sugru is a moldable rubber product that you use to do lots of things with.  It dires in about 24 hours and becomes very rubbery, not solid and hard.  It's great for molding handles onto things, I've also used it to make x-acto blade handles more comfortable and less "rolly".  Here is a link to the product on Amazon.

  Anyhow, you just knead it a while, shape it to what you want then apply it.  It sticks to jut about anything (but it can be removed if you hate what you did...).   So I shaped it, put it on the airbrush then went through the motions of using it to get the fit right.  Then I just let it cure overnight and presto, instant comfortable airbrush handle. 

  So, that's it.  Hope it helps somebody!


Friday, March 25, 2016

WHFB Players killed their game, don’t let them kill AoS too

 
  Hopefully the hate has died down and I can write this without getting lynched.  When GW announced that they were killing WHFB, I was not too surprised.  Everyone knew the game was dead (from a sales perspective) and it showed.  I won’t list the litany of problems with the game, from convoluted rules, to an entry price that was too high even for well heeled folks.  Not to mention the drudgery of painting 62 skeletons/skaven/troopers/etc. only to have them destroyed before turn one.

  Now, I know I am not breaking new ground here, but it really was the existing fan base that killed the game.  I know none of them ever intended it, or even meant for it to happen, it was a by product of the system and the evolution of the game.  All the players I know of had their armies, and they were not adding to them.  They were not buying new stuff.  Add to that the fact the GW hadn’t really put out anything new of fresh in a while and stagnation is the only possible end result.

  One thing that really surprised me though was the pure vitriol that spewed forth over AoS.  I know EXACTLY how I would feel if WH40K got the same treatment, so I am not saying anyone was wrong for it.  I’m just kind of shocked at the energy that was put into hating on AoS and GW.  If half of that energy had been put into creating a vibrant, demanding WHFB community, who knows where we would be by now?  But for the community to so soundly crush AoS before ever even seeing it or playing is pretty astounding to me.  I know when rage overcomes reason that things tend to get ugly, but seriously, come on. 

  I have played some AoS (and I never would have played WHFB) and I have enjoyed it.  I have been reasonably amused at the folks that have put up video batreps and other such items without understanding the idea of the game.  I played through a few scenarios and found that there are some VERY important differences with this game and other GW type games.

1 - Scenarios are critical.  If you play a “kill the warlord” game, it is going to suck.  Flat out, suck.  It is a system designed for the warscroll/battleplan paradigm that they have introduced with the game.  Scenarios are often designed with some strange rules that make sense only when you see them in action.  Also pay attention to the Time of War entries as well.  Some of these rules are critical to recreating the scenarios.

2 - Terrain is required and critical as well.  Playing on a wide open board is lame as hell and ruins the effect as well as the game play. 

3 - You can buy into this game VERY inexpensively - Hell all the rules are free.  This really is a gateway drug, and there aren’t many of those games left.  New folks to the hobby can get into this game with just a starter set and have some reasonably good fun for a while.  Then they can branch out more and more until they scratch that itch or chuck it all.  Along the way they will find other races, new models and who knows, we may have a new 40k gamer out there, or a Warmachine player…  who cares, as long as the hobby grows.

4 - The game is fun.  That’s right, it is anathema to tournament players.  It is the anti-christ for all hard-core gamers.  It is designed for fun, meant to be fun and is fun.  It is not for the beat-face, net-listing, IN YOUR FACE gamer.  So if you are that guy, please don’t run it down  just to make yourself feel superior.  All your doing is killing the hobby and ruining it for everyone.
 
  I have never understood why someone who does not like a particular game/system/faction has to run it down, loudly for everyone to hear, just to make them fell better about themselves??  You do not need to explain to me how much AoS sucks in the face of the death of WHFB.  All your blustering will not bring WHFB back.  It’s dead, turn the page.  If you cannot get over it, move on to other systems and stfu.  (I hear wrath of kings is a good replacement and they are trying to get rules out to cover every WHFB model ever made.  Very good idea, I must say.)  Just don’t try to ruin my fun, and anyone else’s who wants to give AoS a legitimate chance.  If it’s not your thing, fine.  Move along.  You ruined your game, don’t ruin mine.